


 This was the first time we have had the opportunity to take on a project like this, total customization and custom shapes on a three dimensional surface. ATV Graphics are difficult, let’s just get that out of the way. With the amount of compound curves and irregular shape, a full head-to-toe vehicle wrap is almost out of the question. It CAN be done, but the amount of time to precisely figure out where each element will land on the body work would be enormous. We took some time out next to enjoy a day of miniture gold and racing high performance go-karts with the kids. Also, there would be a lot of material waste. It’s pretty much guaranteed that the first try would not fit right. Also, since the material is applied by hand, each subsequent try is going to be slightly different. Stretching the wrap material would distort the graphics in certain areas also. So, we had to devise a way to produce ATV graphics that would be cost efficient and look good. Isn’t that the goal of every project?
Custom ATV Graphics Templates
When we were approached by Fancy Storm Racing to produce the ATV graphics for their competition quad racers, we jumped at the opportunity. These machines are amazing! Powder coated frames, carbon fiber wheels; some of these quads cost more than a passenge car. First thing we noticed, this particular quad had custom, aftermarket body work. Normally, we could just order a stock graphics kit and copy the shape for our template. But since this was not OEM plastic, we were going to have to create our own templates. Also, this particular brand of plastic did not come only in white. The client had taken it to a body shop and had it painted black. After the body shop color sanded and buffed it, the paint was flawless! It looked like you were looking it a a black mirror.
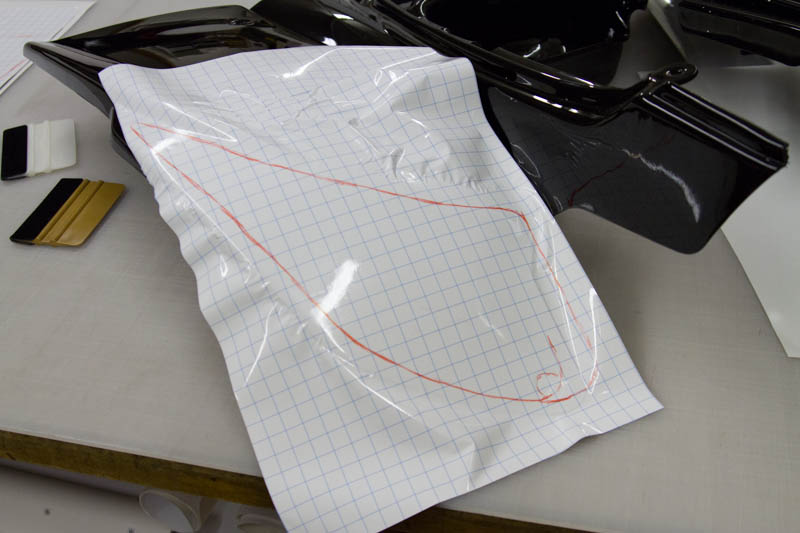 The first step to produce the templates was to print out sheets of grid paper on wrap material. After lamination, we applied the grid wrap to the plastic bodywork, heating and stretching as necessary. Avoiding extreme stretching was necessary because we wanted to avoid distorting the material too much. Once we had the material down, we took a grease pencil and drew out our template on the grid. Doing so allowed us to see the flow of the bodywork and have a feel for the flow of the plastic. Once we had our general shape, we pulled off the grid and applied it back to the original backing paper. At times, we had to heat the material for it to flatten back to the paper backing, again, we tried to keep this at a minimum. Our next step was to scan the template. Some pieces were too big to get in one scan, so we had to scan each section and assemble the pieces in PhotoShop. Final step was to place the scans into Illustrator and trace the template using the Pen tool. Designing the graphics with these templates was a challenge as each piece was separate, but we had to visualize how they would all fit together once the plastic was installed on the bike.
The client also wanted all the sponsor logos incorporated into the ATV Graphics, instead of placing separate stickers on top. We thought this would be a challenge, but every sponsor was quick to respond with their logo. We designed all the graphics in Adobe Illustrator. We printed the materials on Avery MPI 1005 RS which is a little more tacky than the 1005 RS EZ, suitable for ATV Graphics.
Overall, we were incredibly pleased with the results. More importantly, our client was happy with the way the project turned out. We have four more quad racers to do for Fancy Storm Racing in the coming months. We’re even more excited to be involved with them and be one of their sponsors for the 2013 racing season.

